
How to Turn a Wall into a Whiteboard: A Comprehensive Guide for Endless Creativity

- Introduction
- Types of Whiteboard Wall Solutions
- How to apply whiteboard paint on walls
- Whiteboard Paint Vs Whiteboard Wallpaper- Difference Between The Two
- Maintenance Tips for DIY Whiteboard Wall
- Key Takeaway
Converting your walls into usable whiteboard areas is a trend that has become popular in the last few years amongst offices, educational sectors, and residential areas.
The answer for how to turn a wall into a whiteboard is to address the challenges of traditional whiteboards by giving the users custom-made surfaces that can meet their creative and organizational needs.
Whiteboard walls provide a useful and affordable substitute for traditional boards to promote cooperative work sessions, improve educational activities, or keep an orderly workflow.
This comprehensive guide examines the various methods available for creating whiteboard walls, from specialized paints to adhesive films, while providing detailed insights into surface preparation and maintenance requirements.
Types of Whiteboard Wall Solutions
When looking for writable surface solutions, three premier whiteboard choices take the market (these are listed below). Each of these whiteboards has its different advantages with regard to the complexity of installation, durability, and overall performance.
Knowing the fundamental differences between whiteboard paint, wallpaper, and film will thereby make informed decisions about your project conditions and needs.
1. Whiteboard Paints

Whiteboard paint is a solution that transforms any smooth surface into a writable area. This paint has gained popularity among homeowners and businesses seeking a seamless, integrated appearance that matches their existing décor.
The paint comes in white, magnetic, and transparent finish, providing flexibility in design choices and the ability to create custom color schemes when applied over existing wall colors.
How It Works
The application process involves multiple steps to ensure optimal performance. The wall surface must first be thoroughly prepared through cleaning, sanding, and priming to create a completely smooth base.
Most whiteboard paints require a minimum of two coats, with specific drying times between applications that can extend the project timeline to several days.
2. Whiteboard Wallpapers

Whiteboard wallpaper offers a middle-ground solution between permanent paint and temporary films. It provides a self-adhesive surface that can be applied with minimal effort and removed when necessary.
This option appeals particularly to renters, temporary office spaces, or those who anticipate future design changes. Wallpaper features a peel-and-stick backing that adheres directly to walls without requiring additional adhesives or professional installation services.
How It Works
Installation begins with measuring and cutting the wallpaper panels to fit the designated wall area, ensuring proper alignment and minimal seams. The surface must be clean and dry before application, though the preparation requirements are less stringent than those for paint.
3. Whiteboard Films
Whiteboard films represent the most flexible and professional-grade solution available. It consists of durable, static-cling or adhesive-backed sheets that provide superior writing and erasing performance. These films are engineered with advanced materials that resist ghosting and staining. They are available in roll and can be applied as needed.
Whiteboard Films come in White, Transparent, and in Projector forms.
How It Works
The installation process requires precision but remains accessible to individuals with basic DIY skills however these films are only recommended for walls that are smooth like composite panels or wooden wall panels not wallboards where whiteboard wallpapers or paints would be used. The film is carefully applied to the wall, starting from one edge and gradually working across while using a wallcovering spatula to push out the trapped air bubbles.


How To Apply Whiteboard Paint On Walls?

The application of whiteboard paint requires meticulous preparation and careful execution to achieve a functional, long-lasting surface. Unlike standard wall paint, whiteboard coatings demand perfect smoothness and proper curing to perform effectively. Let’s look at the steps on how to turn a wall into a whiteboard below:
Step-by-Step Installation Guide for Whiteboard Paint
Before turning your wall into a whiteboard, you’ll need to pick up some Matte Whiteboard Paint, Smart Whiteboard Paint, or Clear Whiteboard Paint.
Let’s read the whiteboard paint steps to create a whiteboard wall effectively and professionally. Then follow the How To Turn A Wall Into A Whiteboard Guide for installation below.
Step 1: Surface Preparation
Begin by sanding the wall to remove all dirt and imperfections. Any existing imperfections, such as holes, cracks, or uneven textures, must be addressed with a normal decorator’s filler.
Once repairs have dried completely, sand the entire surface with fine-grit sandpaper to create a uniformly smooth finish. This step proves critical, as even minor surface irregularities will telegraph through the whiteboard paint and compromise writing quality.
Step 2: Prime the Surface
Apply 2 coats of high-quality primer from Smarter Surfaces designed for smooth finishes, ensuring complete and even coverage across the entire area.
The primer creates a consistent base that enhances the whiteboard paint's performance and adhesion. Allow the primer to dry, typically 12 hours, before proceeding.
Lightly sand the primed surface with fine-grit sandpaper to eliminate any texture, then wipe away all dust with a tack cloth or damp microfiber cloth.
Step 3: First Coat Application
Mix the whiteboard paint thoroughly according to package instructions, as settling can affect performance. Use a high-density foam roller or mohair roller designed for smooth finishes. Apply the first coat in thin, even layers.
Work systematically from top to bottom, maintaining a wet edge to prevent lap marks. Avoid overworking the paint or applying it too thickly, as this can create texture that interferes with marker performance.
Allow the paint to dry completely.
Step 4: Curing Period
After the final coat has dried to the touch, the surface requires an extended curing period before use. Smarter Surfaces whiteboard paint needs four days to achieve proper chemical bonding.
During this time, avoid touching or marking on the surface. Adequate curing ensures the paint reaches its maximum durability and erasability.
Step-by-Step Installation Guide for Whiteboard Wallpaper

When looking at how to turn a wall into a whiteboard with wallpaper, you will want to choose one of the wall coverings from our functional wallpaper range.
Let’s read the whiteboard wallpaper steps to create a whiteboard wall effectively and professionally.
Step 1: Wall Preparation and Measurement
Clean the wall thoroughly, removing any dust, grease, or residue that might prevent proper adhesion. Smooth bumps or texture for optimal results.
Measure the wall dimensions carefully, accounting for outlets, switches, or other obstacles. With a pencil, mark a straight level, and a horizontal line across the wall, 1.22m off the floor. This will guide the bottom edge of the first section of wallpaper.
Step 2: Cutting the Wallpaper
Lay the whiteboard wallpaper face-down on a clean, flat surface. Using your measurements, mark the cutting lines with a pencil and straightedge.
Cut the panels carefully with sharp scissors or a utility knife, ensuring straight edges that will align properly during installation. If covering a large area that requires multiple panels, plan the layout to minimize visible seams and maintain pattern continuity if applicable.
Step 3: Positioning and Initial Application
Take the wallpaper section you have cut and carefully roll it back up on the paper side on the outside, ensuring you don’t crease the material.
Starting on the left side, place the bottom edge of the wallpaper along the marked pencil line at 1.22m. Roll the wallpaper out along the wall from left to right, ensuring the paper side is pressed to the wall. The pencil line at 1.22m will be your guide.
Using a wallpaper spatula, press the entire surface of the wallpaper to the wall, pushing out all the excess wallpaper adhesive from behind the material.
Use a consistent and strong pressure to ensure all air bubbles and excess adhesive have been pushed out to the edges
Step 4: Butt Joining Application
For joining the material, we recommend you butt the material together. The material is supplied with clean, straight edges that will meet evenly.
We recommend hanging the first section 1.22m above the floor and installing the second section of wallpaper below this.
The material will meet and can be worked together with a wallpaper spatula. Work the material by applying upward and downward pressure to each section along the joint, bringing them together.
Step 5: Overlap and Double Cut
Hang the next section of wallpaper, overlapping the edge of the previous section by 2-3cm. Mark a straight line along the middle of the overlapping section with a pencil.
With a new blade, cut along the pencil line and through both layers. Remove the excess material from behind the cut.
The two sections will now meet and can be worked together with a wallcovering spatula, applying pressure up and down to each length to bring them together.
Repeat this process for the entire installation of the wallpaper
Step 6: Final Inspection and Dry Time
Examine the installed wallpaper carefully for any remaining air bubbles or areas of poor adhesion. Small bubbles can often be worked out toward the nearest edge using firm pressure with the squeegee.
For persistent bubbles, carefully pierce the center with a pin and smooth the air out through the tiny hole. Run the spatula along all seams and edges one final time to ensure complete bonding.
Use Whiteboard Wallpaper after 24 hours following installation to allow the adhesive to dry.
Whiteboard Paint Vs Whiteboard Wallpaper- Difference Between The Two
Selecting between whiteboard paint vs whiteboard wallpaper requires careful evaluation of factors that extend beyond initial cost considerations.
While both solutions serve the same functional purpose, their distinct characteristics influence installation complexity, longevity, aesthetic integration, and long-term maintenance requirements.
Understanding these differences enables stakeholders to align their choice with specific project parameters and future flexibility needs.
1. Durability and Installation
Whiteboard Paint- Writable Surface Solution
Whiteboard paint represents a permanent modification that integrates seamlessly with existing architecture but requires removal through sanding and repainting.
The installation process demands significant preparation work, multiple coats with drying intervals, and a mandatory curing period of four days before use.
Whiteboard Wallpaper- Writable Surface Solution
Whiteboard wallpaper on the other hand, offers a semi-permanent solution that can be removed with minimal wall damage, making it suitable for rental properties or spaces requiring design changes.
Installation normally completes in a single day with immediate usability, requiring less intensive surface preparation and no curing time.
2. Performance and Aesthetics
Whiteboard Paint- Writable Surface Solution
Whiteboard paint delivers superior long-term durability and resistance to wear when properly applied. The hard, chemically bonded surface withstands repeated use while maintaining consistent performance over many years.
Paint excels in creating seamless, integrated surfaces without visible seams, and clear formulations allow application over existing colors for custom schemes.
Whiteboard Paint- Writable Surface Solution
Whiteboard wallpaper performs well initially but may experience accelerated wear at seams and edges, with adhesive potentially weakening in high-humidity environments. Multiple panels create visible seam lines, though premium products now offer durability comparable to painted surfaces for five to ten years under normal use.
3. Cost and Maintenance
Whiteboard Paint- Writable Surface Solution
Initial material costs for whiteboard paint range higher than wallpaper, though the differential narrows when factoring in primers and preparation materials. Paint's superior longevity may justify higher initial costs for permanent installations, while wallpaper's lower investment suits temporary applications.
Whiteboard Paint- Writable Surface Solution
Whiteboard wallpaper required easy repairs, as damaged sections can be replaced with new panels, providing advantages in high-traffic environments.
Both solutions require regular cleaning with appropriate whiteboard cleaners. Whiteboard paint surfaces can be thoroughly cleaned and reconditioned, though significant damage necessitates complete repainting.
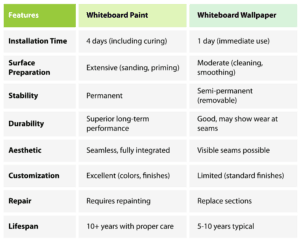
Comparative Analysis Table
Maintenance Tips for DIY Whiteboard Wall
Once you’ve successfully followed the steps in our How to Turn a Wall into a Whiteboard guide, it’s essential to maintain it properly to ensure its longevity and usability. Here are some tips on the best products for creating a whiteboard wall:
1. Use High-Quality Markers
Always use markers specifically designed for dry erase boards. Low-quality markers can leave permanent stains and compromise the surface.
2. Regular Cleaning
Perform routine cleaning using specialized whiteboard cleaners to remove any residual ink or dust.
3. Avoid Abrasives
Never use abrasive cleaners or scouring pads, as they can scratch and damage the surface.
4. Replace Markers Regularly
Old or dried-up markers can be harder to erase, leading to ghosting over time. Make sure to replace your markers regularly.
Key Takeaway
Transforming a wall into a functional whiteboard is a practical investment that enhances creativity, productivity, and organizational capabilities in any environment.
Whether selecting the durability of whiteboard paint or the flexibility and ease of wallpaper installation, both solutions offer distinct advantages tailored to different needs and circumstances.
The answer to how to apply whiteboard paint on walls depends on proper installation for creative office walls or DIY whiteboard walls depend on thorough surface preparation, following manufacturer guidelines, and commitment to proper maintenance practices.
By understanding the technical requirements and evaluating project-specific constraints outlined in this guide, individuals can confidently implement whiteboard wall solutions that deliver lasting performance.
