
How to Make a Whiteboard Interactive in an Instant: The Ultimate Guide to Transform Your Office or Classroom

- Introduction
- What Is an Interactive Whiteboard?
- How to Make a Whiteboard Interactive on a Cost-Effective Budget
- What You Need to Create an Interactive Whiteboard
- Step-by-Step Guide on How to Make a Whiteboard Interactive
- Why an Interactive Whiteboard May Not Be Responding
- Ways to Maximise Your Interactive Whiteboard Usage
- Comparison: Standard Board vs Interactive Setup
- Room-Specific Applications for Interactive Whiteboards
- Expanding Your Interactive Surface With Compatible Technology
- Final Words
Many organisations across education, corporate environments, and training facilities are now looking for efficient ways to add interactivity to their rooms without the significant cost of traditional interactive whiteboards. With the rising interest in interactive whiteboards for classrooms and cost-effective digital tools, the focus is shifting to smarter, more adaptable solutions
The goal is to enhance collaboration, increase engagement, and establish a workspace that facilitates real-time updates and digital communication. This is exactly why understanding how to make a whiteboard smart and how to turn any wall into a smart whiteboard has become an essential topic for decision makers.
Modern surfaces and projectors now allow you to create your own whiteboard or build a DIY interactive whiteboard for classroom that functions like premium systems, but at a fraction of the cost. With demand rising for digital dry erase solutions and interactive whiteboards for schools, this guide offers a complete, professional approach.
What Is an Interactive Whiteboard?
An interactive whiteboard is a multifunctional digital display that allows users to access computer content on a large surface through a projector. It enables presenters to physically interact with the projected image using a finger, stylus, or interactive device. This creates a smartboard whiteboard environment that supports efficient communication and enhances collaboration across teams.
As organisations increasingly search for what an interactive whiteboard is and how they compare to digital projectors, many discover that traditional smart white boards tend to be expensive, heavy, and require specialised installation. This is why more teams now compare interactive whiteboard vs projector setups before making decisions.
Using modern interactive projection paired with a projectable surface, such as Projector Whiteboard Wallpaper, enables you to achieve comparable performance without the cost and complexity of standard hardware.
How to Make a Whiteboard Interactive on a Cost-Effective Budget

Creating an interactive whiteboard does not require expensive panels or proprietary systems. For those researching a budget interactive whiteboard setup, selecting a high-quality ultra-smooth whiteboard surface and combining it with an interactive projector provides full functionality at a significantly reduced cost.
This approach is ideal for offices seeking user-friendly tools for brainstorming, classrooms requiring interactive teaching environments, training rooms that demand digital flexibility, and hybrid teams that rely on real-time collaboration. It is also a leading method for people searching for how to make a whiteboard interactive without investing in traditional smartboard units.
Solutions such as Projector Whiteboard Wallpaper enable teams to write on the wall while simultaneously projecting digital content with low glare and sharp clarity. For organisations exploring DIY smart whiteboard options, this method delivers long-term savings and a professional-grade user experience.
What You Need to Create an Interactive Whiteboard
Teams planning what you need to create an interactive whiteboard setup should begin by selecting the correct materials. A projectable whiteboard surface, such as Projector Whiteboard Wallpaper, is necessary to achieve high-quality projection and smooth writing performance. This material supports both dry erase markers and interactive projection.
A reliable digital projector is equally important. Models such as the BenQ MX825STH are chosen for their clear imagery and short throw distance, making them ideal for interactive teaching walls and collaborative workspaces.
A computer or laptop with projection capability is required to run the display content. Interactive software then allows features such as annotation, real-time editing, whiteboard chat functionality, and collaborative tools suitable for educational and corporate use.
Connectivity cables such as HDMI or VGA must be included based on system requirements. Some teams also use interactive pens or similar devices to enhance touch-based control. Additionally, high-quality dry erase markers and professional cleaning accessories ensure the surface remains clear and long-lasting.
Step-by-Step Guide on How to Make a Whiteboard Interactive
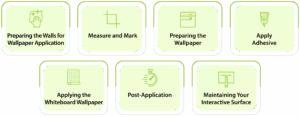
Preparing the Walls for Wallpaper Application
Prepare the wall for long-term durability. Protect the floor, fill cracks, remove old coverings, clean thoroughly, sand where necessary, and prime with White Primer for optimal adhesion.
Measure and Mark
Mark a straight horizontal line at 1.22m above the floor to ensure a level installation.
Preparing the Wallpaper
Roll out the wallpaper on a protected surface, measure carefully, and cut using sharp scissors.
Apply Adhesive
Prepare a heavy-duty adhesive and apply two even coats using a roller.
Applying the Whiteboard Wallpaper
Align the bottom edge with the 1.22m guideline and unroll gently, pressing out air bubbles. Apply additional sections using the butt joint method.
Post-Application
Allow the surface to dry for 24 hours. After 30 minutes, press out visible air bubbles with a spatula.
Maintaining Your Interactive Surface
Regularly clean using a Micro-Fibre Eraser Cloth and appropriate cleaning fluids to maintain clarity and long-term performance.
Why an Interactive Whiteboard May Not Be Responding
If the interactive surface is not functioning as expected, the most common issues relate to connectivity, calibration, software, or projector alignment. Loose HDMI or VGA cables may disrupt input signals between the computer and projector. Interactive systems often require calibration, especially after being moved.
Outdated software or version mismatches can disrupt interactive capabilities. Projector alignment and focus must also be monitored, as even small shifts affect touch accuracy.
Ways to Maximise Your Interactive Whiteboard Usage
A high-quality interactive whiteboard enables a range of applications. In collaborative sessions, teams can annotate directly onto projected content. In marketing reviews, visuals and layouts can be modified instantly, improving communication.
For education, interactive whiteboard classroom ideas help increase student engagement, with instructors using interactive lessons, visual demonstrations, and touchscreen activities. These methods support schools in their efforts to enhance student engagement with whiteboards as part of modern teaching strategies.
Corporate teams also benefit through real-time updates, planning sessions, and remote collaboration tools that unite in-person and online workflows.
Comparison: Standard Board vs Interactive Setup

Room-Specific Applications for Interactive Whiteboards
In boardrooms, interactive whiteboards enhance decision-making by enabling annotation, strategic planning, and real-time edits on documents.
In classrooms, interactive whiteboards for schools significantly improve engagement with interactive teaching walls that support demonstrations, learning games, and student participation.
Training facilities benefit from simulations and visual modules, while private offices use interactive setups for planning and data visualisation. These room-specific uses align well with growing interest in classroom interactive wall ideas.
Expanding Your Interactive Surface With Compatible Technology
Many organisations enhance their interactive setups by integrating additional tools that turn any dry-erase wall into a smart interactive whiteboard. These accessories extend touch functionality and support gesture-based interaction.
Software platforms with real-time communication features allow remote collaboration, appealing to teams searching for how to create an interactive teaching wall or a flexible digital workspace.
Projectable surfaces also meet niche needs, such as how to turn any wall into a smart whiteboard, making them an ideal upgrade for offices, classrooms, and hybrid work environments.
Final Words
Organisations seeking a modern workspace can explore projectable products such as Projector Whiteboard Wallpaper. For those planning broader upgrades, comparing projector screen alternatives helps determine the best approach for large-format collaboration. Implementing a cost-effective interactive surface ensures long-term savings, improved workflow, and increased productivity.


