
How To Paint A Projector Screen Wall: An Ultimate Guide to DIY Projector Screen Paint
- Introduction
- How Projector Paint Works?
- What Are the Types of Projector Screen Paint?
- How To Paint a Projector Screen Wall?
- Essential Tools and Materials
- Troubleshooting Common Problems
- Why Choose Smarter Surfaces for Your Projector Screen Paint?
- Key Takeaways
Creating a perfect projector with DIY Projector Screen Paint doesn't have to break the bank. While commercial projector screens can cost thousands of dollars and limit your size options, there's a game-changing alternative that delivers professional results at a fraction of the price: projector screen paint.
Modern projector paints have evolved far beyond simple white wall paint. Today's specialized formulations deliver superior light reflection, enhanced contrast, and color accuracy that rivals expensive fabric screens. With proper application, a projector screen will outlast traditional screens by years, maintaining its performance without sagging, wrinkling, or developing hotspots.
Let's read and understand more on how to paint a projector screen wall.
How Do You Make A Projector Screen Work?

Projector screen paint achieves its superior performance through engineered microscopic particles that control how light reflects from the surface.
Unlike regular wall paint that scatters light in all directions, projector paint contains specialized reflective compounds—typically titanium dioxide or barium sulfate particles—that are sized and distributed to maximize forward light reflection while minimizing diffusion. This creates a surface with optimal gain characteristics, meaning it can actually reflect more light back to viewers than a standard white surface.
The paint's formulation also includes binding agents that create an ultra-smooth finish, eliminating the texture that would otherwise cause light scattering and image degradation.
When properly applied, these microscopic particles align to form a uniform reflective layer that enhances brightness, improves contrast ratios, and maintains color accuracy across the entire viewing area. Screen paint for projector turns your wall into an optical surface designed specifically for projection.
What Are the Types of Projector Screen Paint?

Projector screen paints are categorized primarily by their gain characteristics (the measure of how much light they reflect compared to a standard white surface). Understanding these different types is crucial for selecting the right DIY Projector Screen Paint for your specific projector and viewing environment.
1. High-Gain Paints (1.2-1.5 Gain)
High-gain paints reflect more light than they receive, making them ideal for rooms with ambient light or lower-powered projectors. These formulations contain highly reflective particles that boost image brightness by 20-50% compared to a standard white surface. However, this brightness enhancement comes with trade-offs: narrower optimal viewing angles and potential for "hot spotting" where the center of the screen appears brighter than the edges.
2. Unity Gain Paints (1.0 Gain)
Unity gain paints provide a 1:1 light reflection ratio, delivering natural color reproduction and consistent brightness across wide viewing angles. These Screen Paint Projectors excel in dedicated home theaters with controlled lighting, where color accuracy takes priority over maximum brightness. They offer the most cinematic viewing experience, closely matching the color standards used in professional theaters.
3. Low-Gain Paints (0.8-0.95 Gain)
Low-gain paints absorb some light to enhance contrast ratios and eliminate reflections from ambient light sources. While they produce a slightly dimmer image, they deliver superior black levels and color depth, making them perfect for high-end projectors in light-controlled environments. The DIY Projector Screen paints are favored by those who prioritize high contrast and color accuracy over raw brightness.
4. Specialty Formulations
Ambient Light Rejecting (ALR) Paints use advanced optical properties to reflect projected light while absorbing ambient light from other angles. Acoustic Transparent Paints allow sound to pass through for behind-screen speaker placement. Outdoor formulations resist weather and UV degradation for permanent exterior installations.
Choosing the right type of Screen Paint for Projector depends on your projector's brightness, room lighting conditions, and personal viewing preferences—factors we'll explore in detail in the planning section.
How To Paint a Projector Screen Wall?
To paint a projector screen wall, one needs precision, patience, and attention to detail. Unlike regular wall painting, DIY projector screen paint application demands flawless surface preparation and specialized techniques to achieve professional results. Here's the complete step-by-step process used by commercial installers.
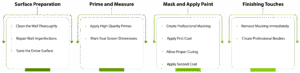
Step 1: Surface Preparation
Clean the Wall Thoroughly
This is the key to a great painted on projection surface, start by removing any dirt, grease, and existing paint imperfections using a degreasing cleaner or a good sanding. Pay special attention to areas around light switches, outlets, and baseboards where oils from hands commonly accumulate. Allow the wall to dry completely for 24 hours minimum before proceeding.
Repair Wall Imperfections
Fill nail holes, cracks, dents, and any surface irregularities with high-quality spackling compound. Use a putty knife to create a smooth, level surface that's flush with the surrounding wall. For larger imperfections, apply compound in thin layers, allowing each to dry completely before sanding smooth.
Sand the Entire Surface
Lightly sand the entire screen area with 120-grit sandpaper to create optimal paint adhesion. Focus on glossy areas, paint drips, and any texture inconsistencies. Vacuum all debris and wipe clean with a dry cloth.
Step 2: Prime and Measure
Apply High-Quality Primer
Use a premium white primer in two thin coats rather than one thick coat. Apply with a high-quality smooth roller. Allow 4-6 hours drying time between coats and 24 hours before measuring. Sand again the entire surface lightly.
Mark Your Screen Dimensions
Use a measuring tape to mark your screen area. Apply the 3-4-5 triangle method to ensure perfect corners: measure 3 feet along one edge, 4 feet along the adjacent edge, and verify the diagonal measures 5 feet. Mark lightly with a pencil - these marks will be painted over.
Step 3: Mask and Apply Paint
Create Professional Masking
Apply high-quality painter's tape around your marked screen area, pressing edges firmly to prevent paint bleed. Leave additional space for a 2-4 inch black border around the screen perimeter. Cover surrounding areas with plastic sheeting.
Apply First Coat
Using a nap foam or lint free smooth roller, apply DIY Projector Screen Paint in systematic overlapping strokes. Work from top to bottom in 3-foot sections, maintaining consistent pressure and speed. The key is thin, even coverage rather than trying to achieve full opacity in one pass.
Allow Proper Curing
Most projector paints require 6-8 hours between coats under optimal conditions (68-72°F, 40-50% humidity). Resist rushing this step - improper drying affects the final surface quality and optical performance.
Apply Second Coat
Apply the second coat perpendicular to the first coat's direction (horizontal if first was vertical). This cross-hatching technique ensures complete coverage and eliminates any potential streaking or texture variations.
Step 4: Finishing Touches
Remove Masking Immediately
Remove painter's tape while the final coat is still slightly tacky (about 30-60 minutes after application) to ensure clean, sharp edges. Pull the tape away from the painted surface.
Create Professional Borders
Apply flat black paint or high-quality black velvet tape to create a border around your screen area. This border absorbs stray light and significantly enhances perceived contrast.
What are the Essential Tools and Materials Required?
Success in DIY projector screen paint depends heavily on using the right tools and materials. Professional-grade equipment not only ensures superior results but also makes the application process more efficient and enjoyable. Here's a complete list organized by project phase.
1. Sandpaper and Abrasives
2. Repair and Preparation Materials
- Drop cloths and plastic sheeting
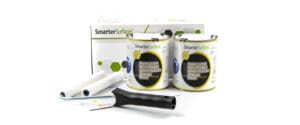
- Premium white primer like Smart White Primer from Smarter Surfaces
3. Application Equipment
- Nap foam rollers
- Roller frames
- Paint trays with disposable liners
- Roller covers
4. Precision Brushes
- Angled brush
- Flat brush
- Fine-tip artist brushes
5. Measuring and Layout Tools
- Measuring tape
- Metal straightedge
- Pencil
- Masking film
- Chalk line
Many tools can be reused for future projects or home improvement tasks, making the investment more valuable than the initial cost suggests. Quality measuring tools, brushes, and safety equipment will serve you for decades.
Troubleshooting Solutions for Common Issues

The key to a flawless screen paint for projector is prevention, not correction. By understanding potential issues before they occur, you can implement strategies that eliminate problems rather than fixing them after the fact. Here's a comprehensive troubleshooting guide based on real-world project experiences.
1. Surface Preparation Issues
The common problem is visible texture showing through the paint. As a solution, test paint on a small area first. Sand with 400-grit paper between primer and paint if texture appears.
Another issue is paint adhesion failure. For this, use a bonding primer on glossy surfaces. If the primer beads up, stop, degrease, sand, and restart.
2. Application Problems
One of the common issues is visible brush or roller marks. As a solution, use only ¼-inch nap foam rollers with consistent pressure. Re-roll problem areas within 30-45 minutes while the paint is still workable.
Where there is uneven coverage and streaking, apply two thin coats instead of one thick coat. If caught early, lightly mist with water and re-roll with a nearly dry roller.
In case of orange peel texture, thin paint slightly and reduce roller pressure. Sand lightly between coats with 400-grit paper.
3. Environmental Control Issues
Paint drying too quickly is the most discussed problem. To solve this, increase humidity, reduce temperature, and slow application speed to maintain wet edges longer.
In case the paint does not cure properly, improve ventilation, control humidity to 40-50%, and allow extended drying time before additional coats.
4. Border and Edge Problems
Use high-quality tape, press edges firmly, and apply a seal coat of base paint over tape edges first if there is a paint bleeding under the tape issue.
For fuzzy or uneven borders, remove tape while the paint is slightly tacky (30-60 minutes after application). Pull at a 45-degree angle.
5. Color and Contrast Issues
If you feel there is poor image contrast, add 2-4 inch flat black borders around the screen area. Control ambient light sources.
Check projector alignment and ensure uniform paint thickness for hot spots or brightness variations. Apply an additional thin coat if needed.
For color shifts across the screen, maintain consistent paint mixing and application speed. Use the same paint batch for the entire project.
Key Takeaway
Transforming your wall into a professional-grade projector screen using DIY projector screen paint is one of the most rewarding projects you can undertake. With the right preparation, quality materials, and attention to detail, you can achieve results that rival commercial screens costing thousands of dollars while gaining complete control over size, placement, and customization.
Whether you're building a dedicated home theater, upgrading your living room entertainment system, or creating a presentation space, the investment in time and materials will pay dividends for years to come.
As a result, you get an enhanced viewing experience and the pride of achievement that comes with mastering a specialized skill.


